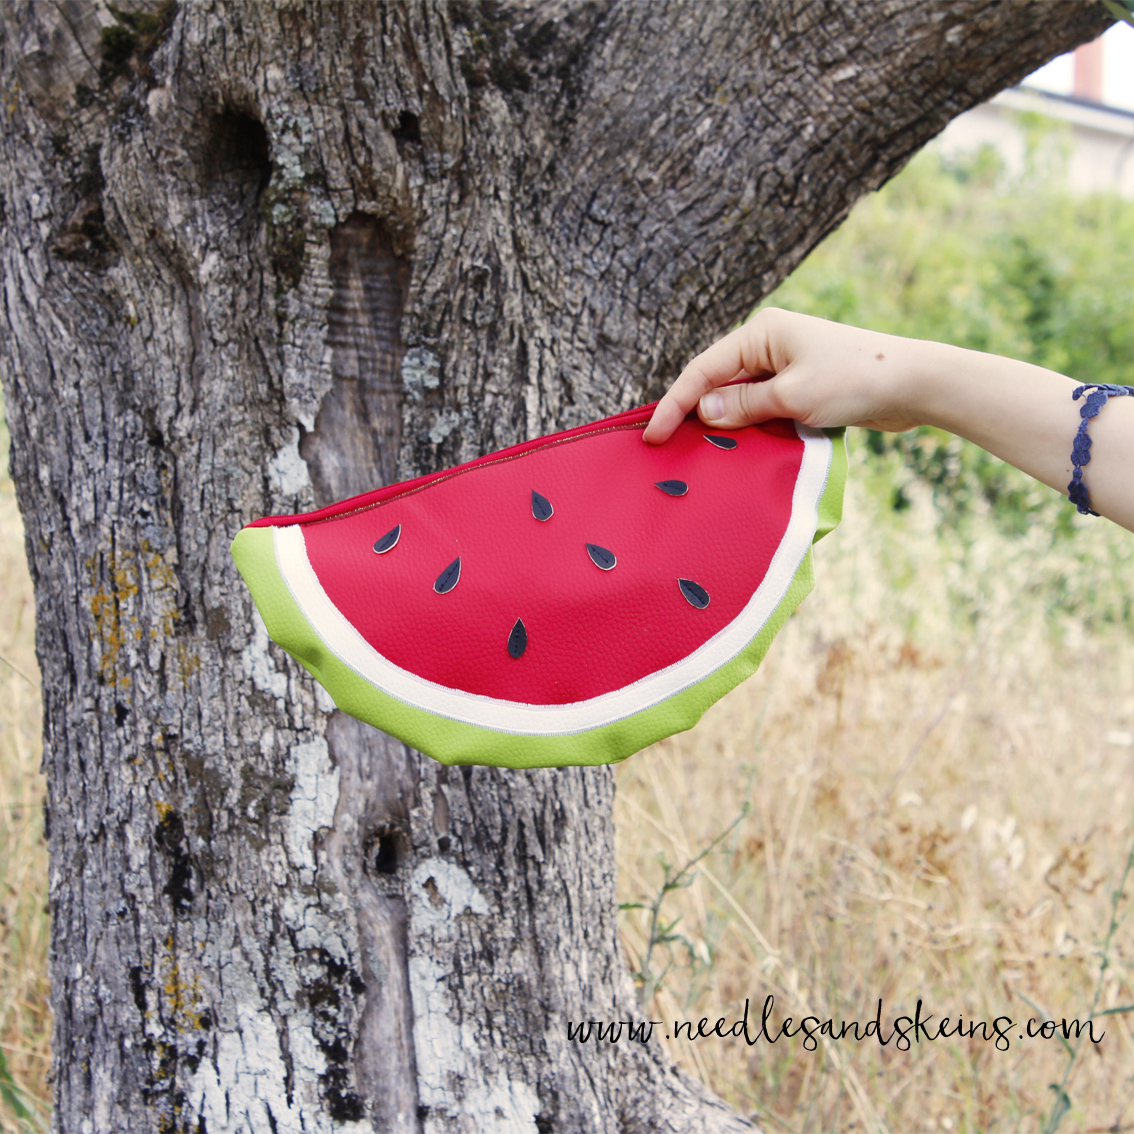
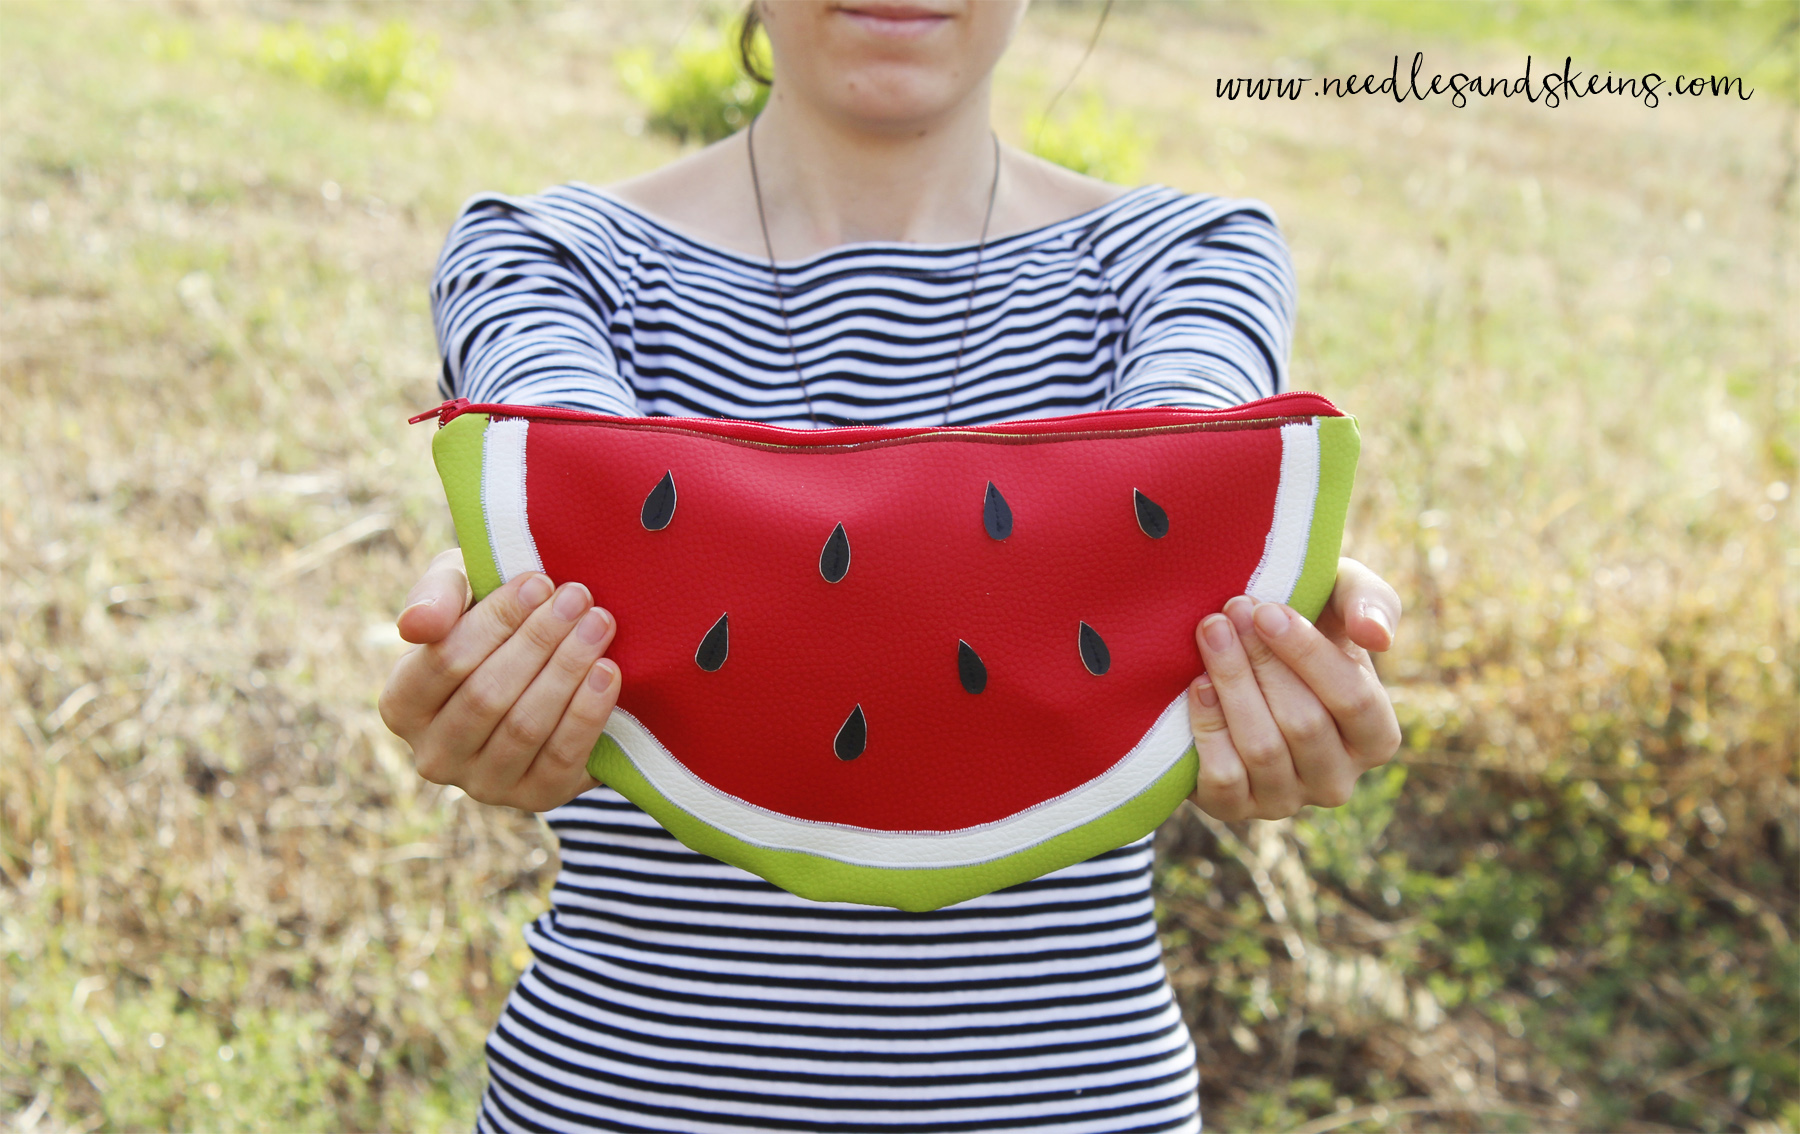
DIY WATERMELON CLUTCH // TUTORIAL + DOWNLOAD

diy watermelon clutch

Hello everyone! After a busy period that kept us away from the blog, we are back with something new... the first post in collaboration with Panini Tessuti , a company from Modena! We are really very happy with this collaboration, with the material they provided us we interpreted a classic of this summer... watermelon! We decided to make a clutch bag in eco-leather , a material that we really like. The one provided by Panini Tessuti is really excellent quality, it is very soft and easy to sew, even in multiple layers... plus it is available in many colors on their online shop ! The company is also a sponsor of the magazine "Ago filo e fantasia" and provided us with all the material to make the tutorial contained in the next issue... of which we will not reveal anything for now ;) Let's move on to the pattern!
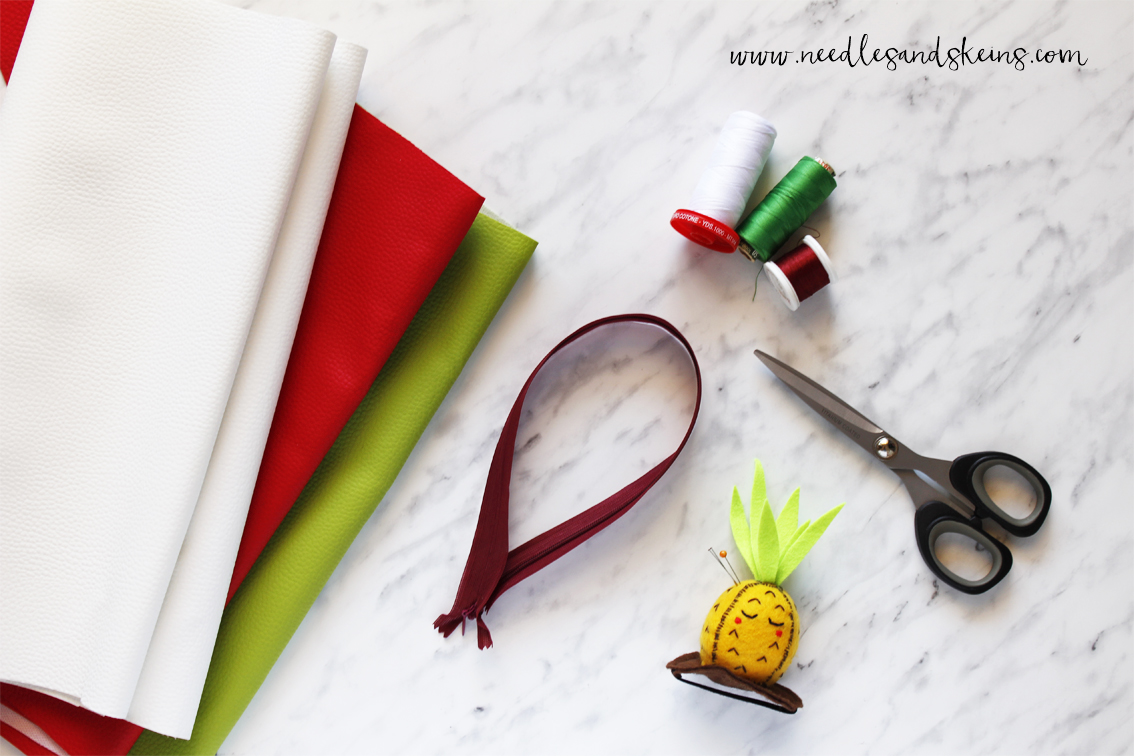
Hello everyone! After a very busy period that have kept us away from the blog, we are back with a news... the first post in collaboration with Panini Tessuti , a textile company from Modena! We are very happy about this collaboration, with the material they sent us we decided to re-think a summer classic...the watermelon! We decided to make a clutch bag in faux leather , a material that we like very much. The one given to us by Panini Tessuti is really high quality, very soft and easy to sew, even in multiple layers...on their online shop it is available in many colors! The company is also a sponsor of "Ago filo e fantasia" magazine and provided us with all the material for the tutorial contained in the next issue...for now we will not reveal anything ;) Let move to the pattern! (For the tutorial click on the "English" label)

diy watermelon clutch

diy watermelon clutch

[wc_tabgroup layout="box"]

[wc_tab title="ENGLISH"]

MATERIALS

  • red, green, white and black medium weight eco leather
  • 30cm red zipper
  • pattern (see below)
  • sewing machine
  • white, red and black sewing thread
  • sewing needle
  • scissors or tailor's wheel
  • tailor's chalk

NOTES ON THE PATTERN

  • Download the pattern in PDF here.
  • The bag pattern includes seam allowances, marked with a dotted line.

PROCEDURE

CUT OUT THE VARIOUS PIECES

Start cutting out the various pieces of the pattern. Secure them to the fabric with pins and draw the outlines with tailor's chalk, then cut it all out [wc_highlight color="red"] (1) [/wc_highlight]. Make sure you have the following pieces:

  • 2 green side panels
  • 2 red panels
  • 2 white stripes
  • 16 seeds

BUILD THE SLICE

Place a red panel right side up, then place a white strip on top, matching them up and pinning them together. Sew them together with a very tight zigzag stitch (it should look almost like a drawstring), using white thread [wc_highlight color="red"] (2) [/wc_highlight].

Cut off the excess red faux leather on the back, under the seam [wc_highlight color="red"] (3) [/wc_highlight].

Sew 8 seeds on the red panel with a central straight seam, using black thread. Then place a green panel with the right side facing up and place the red and white part already sewn on top, positioning it as in the pattern and securing everything with pins. Always with a very tight zigzag stitch, sew the white part with white thread and the red part with red thread [wc_highlight color="red"] (4) [/wc_highlight].

Repeat the operation for the other panel[wc_highlight color="red"] (photo 1-4) [/wc_highlight].

Place the open zipper on the sewn panel, with the straight sides touching [wc_highlight color="red"] (5) [/wc_highlight].

Sew the zipper close to the red edge of the slice, with a straight stitch and using the red thread [wc_highlight color="red"] (6) [/wc_highlight].

On the right side, sew the zip, always with a straight stitch and using the red thread, sewing just under the zigzag cord [wc_highlight color="red"] (7) [/wc_highlight].

Repeat the operation on the other panel [wc_highlight color="red"] (8) [/wc_highlight].

Sew the panels together with the right sides together [wc_highlight color="red"] (9) [/wc_highlight]. Remember to leave the zipper open, or you won't be able to turn the bag over!

Secure the zipper by sewing the ends to the seam allowance inside the bag [wc_highlight color="red"] (10) [/wc_highlight]. Turn the bag over.

[/wc_tab]

[wc_tab title=" ENGLISH "]

MATERIALS

  • red, white, green and black faux leather
  • 30cm zipper
  • template (see the notes below)
  • sewing machine
  • white, red and black thread
  • sewing needle
  • scissors
  • taylor chalk

TEMPLATE NOTES

  • Download the pdf template here.
  • Watermelon template includes seam allowances (dotted line).

TUTORIAL

CUTTING OUT

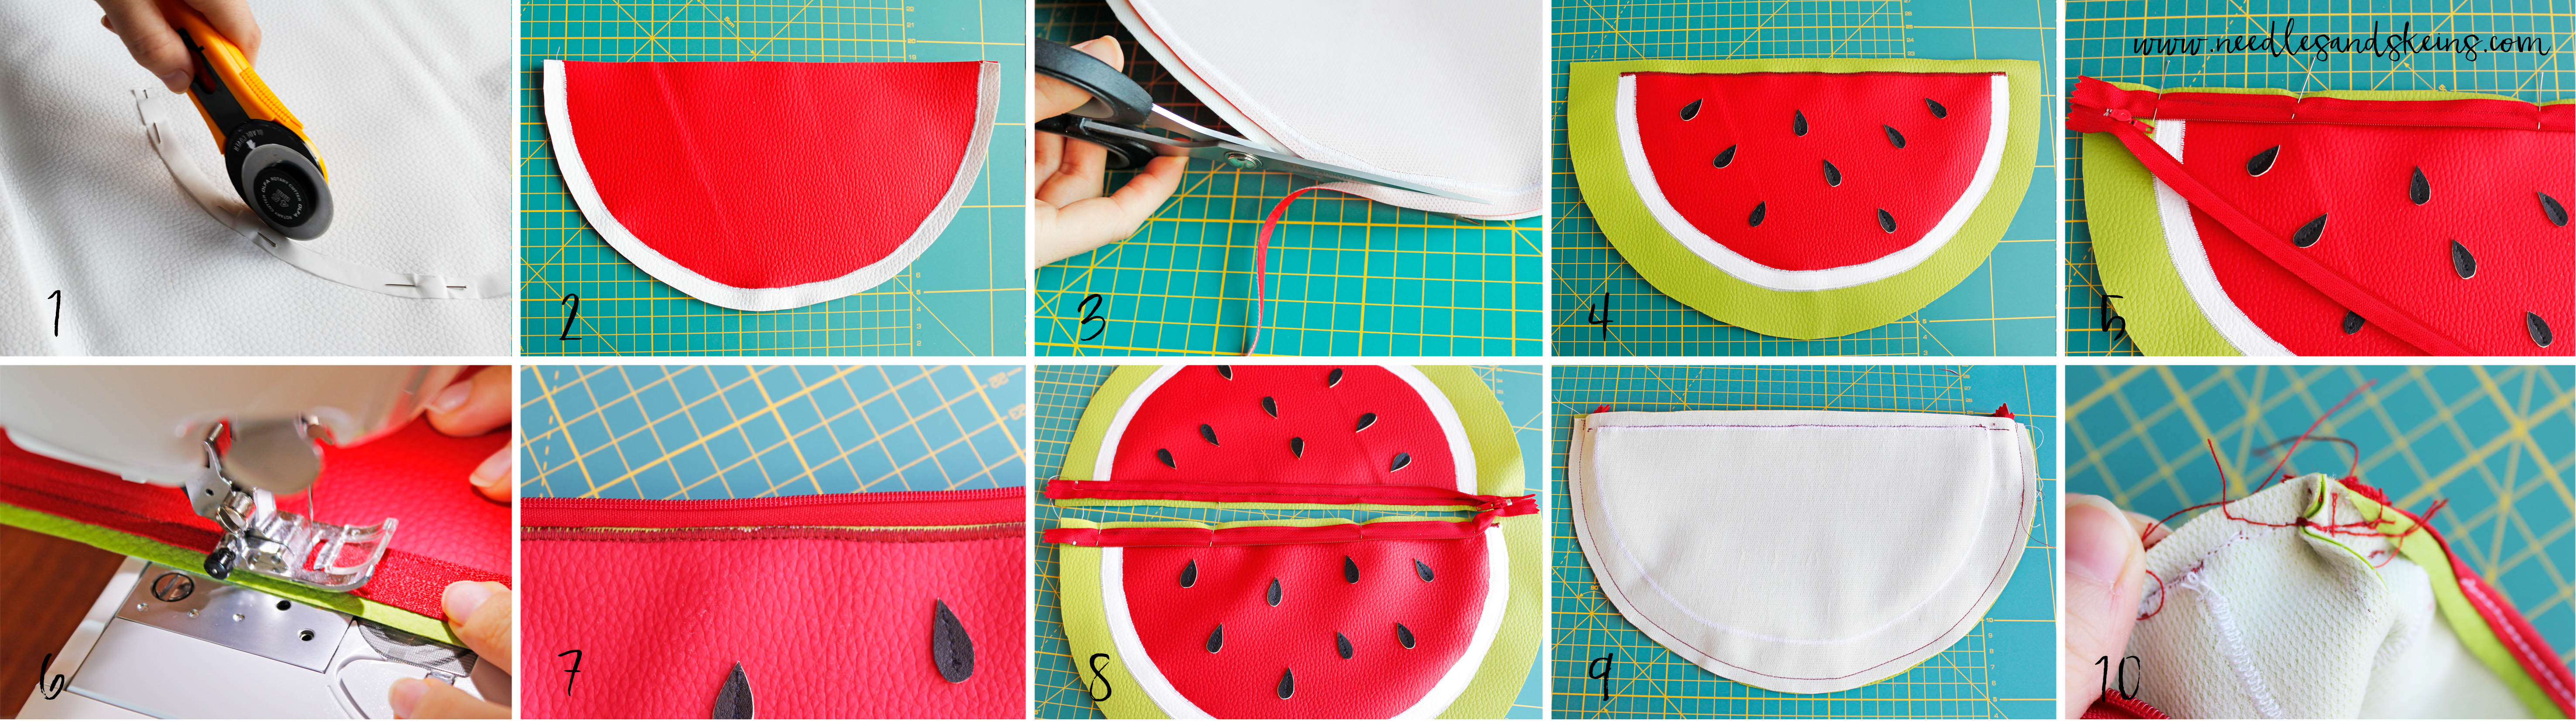
Start cutting out the template pieces. Pin them to your faux leather, draw around the pieces using a tailor chalk, then cut them out [wc_highlight color="red"] (1) [/wc_highlight]. Make sure you have the following pieces:

  • 2 sides in green
  • 2 sides in red
  • 2 stripes in white
  • 16 black seeds

CONSTRUCT THE SLICE

Place a red panel right side up, then lay a white stripe on the top, making them fit together, and stop them with pins. Sew them together with a very tight zigzag stitch (the seam must look like a cord), using the white thread [wc_highlight color="red"] (2) [/wc_highlight].

Cut the exceeding red faux leather on the back, under the seam [wc_highlight color="red"] (3) [/wc_highlight].

Sew 8 seeds on the red panel with a central straight stitch, using the black thread. Then place a green panel right side up and lay on it the previously sewn red and white panel, placing it as the template and stopping them together with pins. Then, always using a very tight zigzag stitch, sew the white part with the white thread and the red part with the red thread [wc_highlight color="red"] (4) [/wc_highlight].

Repeat the operations for the other panel [wc_highlight color="red"] (pics 1-4) [/wc_highlight].

Place the open zipper on the stitched panel, with the right sides facing [wc_highlight color="red"] (5) [/wc_highlight].

Sew the zipper near the red edge of the slice, using a straight stitch and the red thread [wc_highlight color="red"] (6) [/wc_highlight].

Press the seam flat on the right side, always using a straight stitch and the red thread, stitching just below the zigzag cord [wc_highlight color="red"] (7) [/wc_highlight].

Repeat the operations for the other panel [wc_highlight color="red"] (8) [/wc_highlight].

Sew the panels together with the right sides facing [wc_highlight color="red"] (9) [/wc_highlight]. Remember to leave the zipper open, otherwise you will not be able to turn the bag out!

Fix the zipper extremes sewing them at the binding inside the bag[wc_highlight color="red"] (10) [/wc_highlight]. Turn the bag out.

[/wc_tab]

[/wc_tabgroup]

diy watermelon clutch

For the occasion you will find us immersed in an unusual bucolic panorama...the countryside near our grandparents' house! XD At first we were a little skeptical, but the bag fits us really well...don't you think?

For this occasion you can see us in an unusual bucolic location...the countryside near our grandparents' house! XD We were a bit skeptical at the beginning, but the bag looks really good in this landscape...don't you think so?

diy watermelon clutch

Back to blog

Leave a comment

Please note, comments need to be approved before they are published.