DIY MARDI GRAS BEAR COSTUME
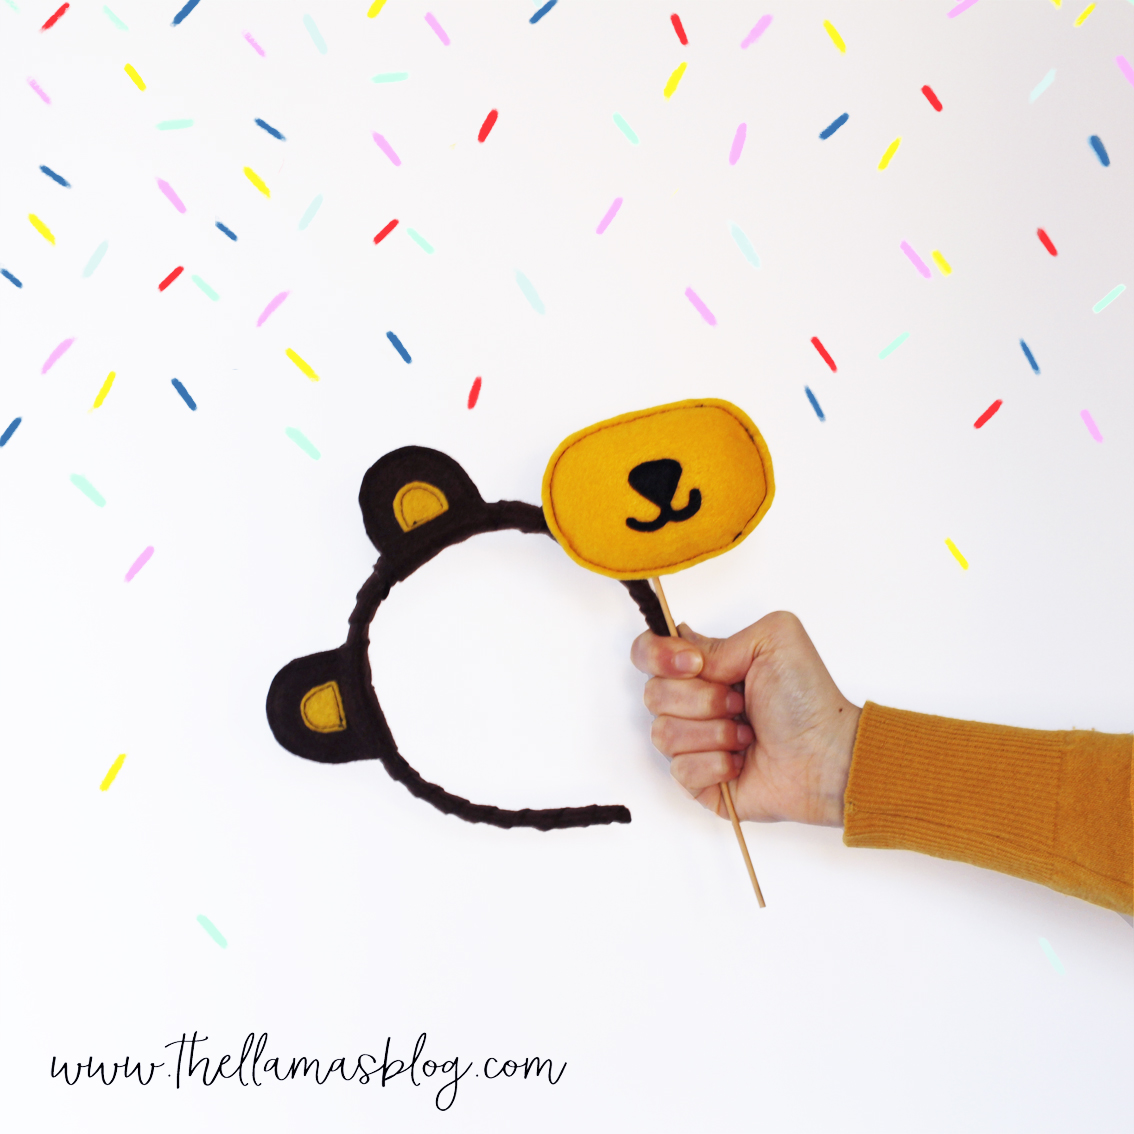
Welcome back! Yes, we survived the Christmas frenzy and are back with a new DIY. We realized that in all these years of blog activity we have never published any tutorial or freebie for Carnival. It is a holiday that allows you to give free rein to your imagination, but who knows why it is often neglected. So we decided to fix that! We have prepared a teddy bear costume that is really easy to make, made up of ears and a face...to complete it you just need a brown or yellow sweater, a little makeup and you're done! Now let's move on to the tutorial!
Welcome back! Yes, we survived Christmas and we're back with a new diy. We realized that in these years of blog activity we never published any tutorials or freebies for Carnival. It's a very colorful and creative occasion, but (who knows why!) it's often overlooked. So we decided to put it right! We have prepared a Bear Costume that is very easy to make, composed of ears and nose...to complete it you just need a brown or yellow sweater, a little 'make-up and you're done! Let's move to the pattern!
FOR THE TUTORIAL IN ENGLISH CLICK ON THE “ENGLISH” LABEL UNDER THE PHOTO.
[wc_tabgroup layout="box"]
[wc_tab title="ENGLISH"]
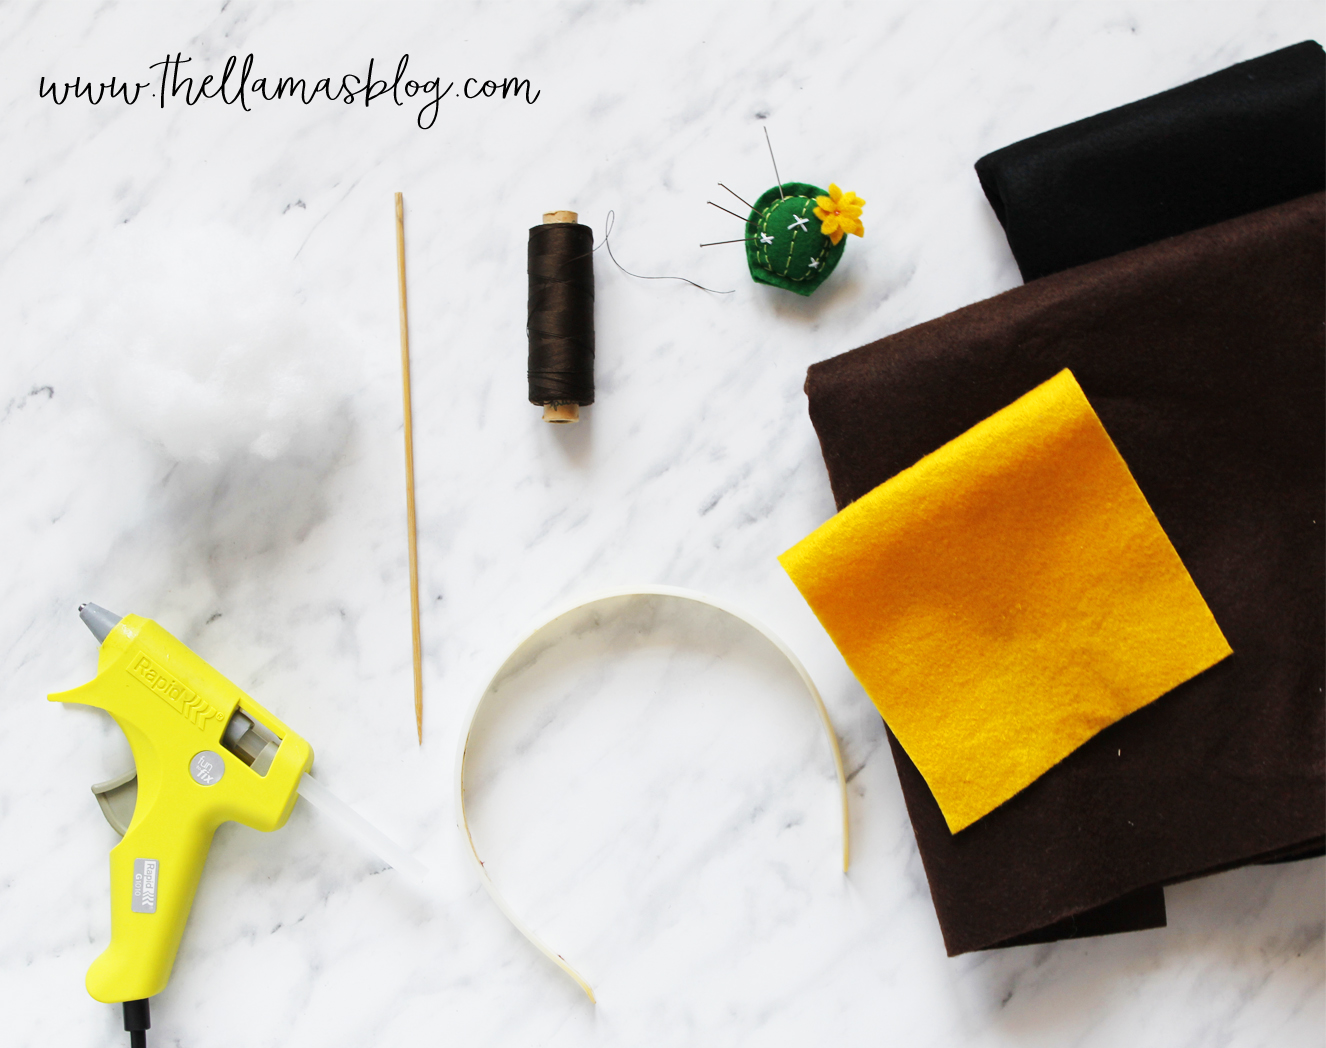
MATERIALS
- brown, yellow and black felt
- pattern (see below)
- headband
- padding
- a wooden or plastic toothpick
- glue (preferably hot glue)
- sewing machine
- black or brown sewing thread
- pins
- sewing needle
- fabric scissors
- pencil or tailor's chalk
DOWNLOAD PATTERN
- Download the pattern in PDF here.
PROCEDURE
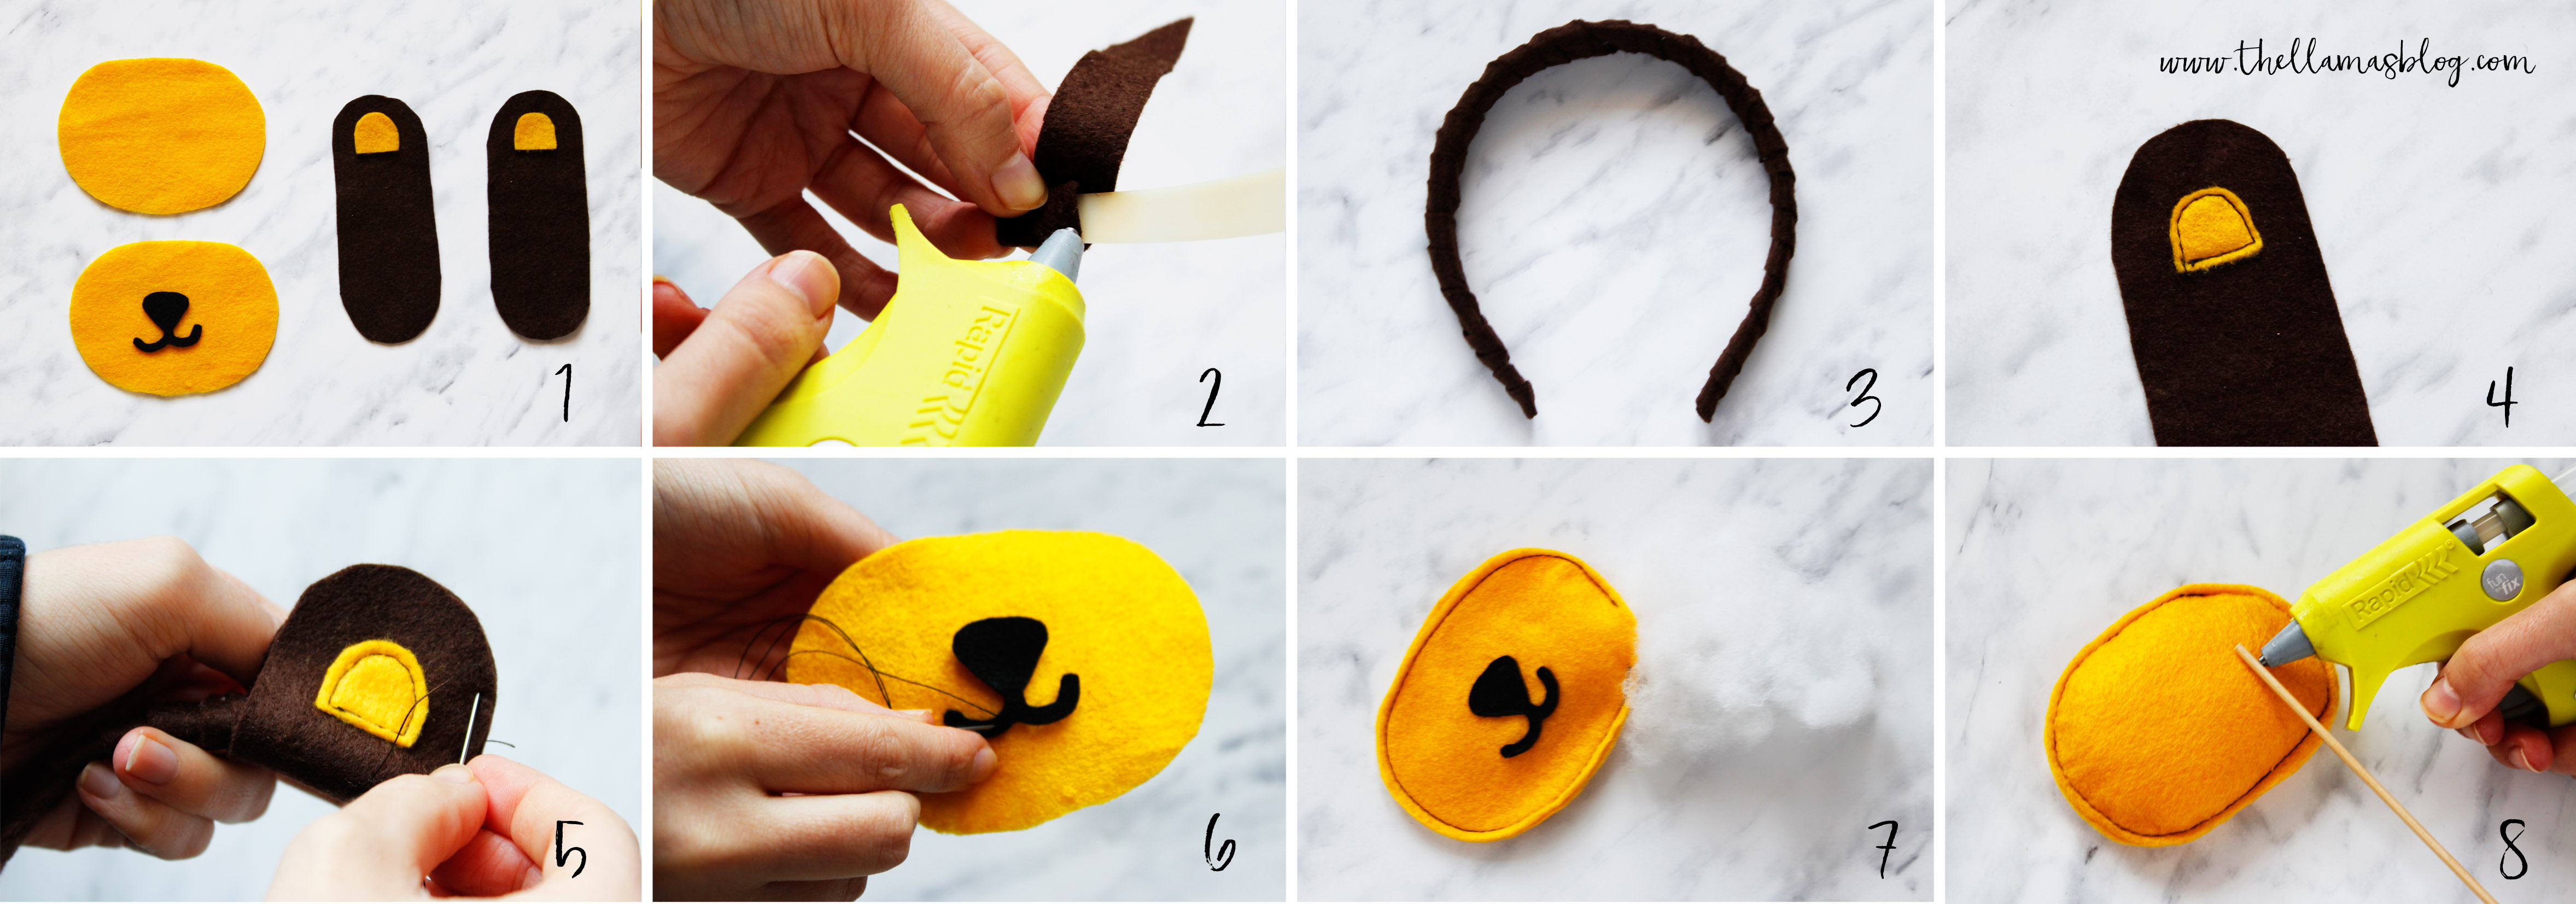
CUT OUT THE VARIOUS PIECES
Start cutting out the various pieces of the pattern. Secure them to the fabric with pins and draw the outlines with the tailor's pencil, then cut it all out [wc_highlight color="red"](1)[/wc_highlight] .
Make sure you have the following pieces:
- two brown ears
- two yellow inner ears
- two yellow muzzles
- a black nose and mouth
COVER THE HEADBAND
Cut out strips of felt and roll them around the headband, securing them in some places with hot glue [wc_highlight color="red"](2)[/wc_highlight] . Continue until you cover the entire headband [wc_highlight color="red"](3)[/wc_highlight] .
CREATE THE EARS
Sew the inside of the yellow ears onto the brown ears, using your sewing machine and brown thread [wc_highlight color="red"](4)[/wc_highlight] . Wrap the ears around the headband, folding them in half and matching the ends. Secure them by hand sewing them at the base, near the headband, and all the way around near the edge, using brown thread [wc_highlight color="red"](5)[/wc_highlight] .
CREATE THE MUZZLE
Sew the nose and mouth onto the snout, using a needle and black thread [wc_highlight color="red"](6)[/wc_highlight] . Match the two yellow pieces and sew them together along the edges using the machine and brown thread, leaving an opening. Fill the snout with stuffing [wc_highlight color="red"](7)[/wc_highlight] and sew the opening. Attach the toothpick to the snout, using glue [wc_highlight color="red"](8)[/wc_highlight] .
[/wc_tab]
[wc_tab title=" ENGLISH "]
MATERIALS
- brown, yellow and black felt
- sewing template (see below)
- hair band
- stuffing
- a wooden or plastic stick
- glue (preferably hot glue)
- sewing machine
- black or brown sewing thread
- pins
- sewing needle
- scissors
- taylor chalk
DOWNLOAD TEMPLATE
- Download the pdf template here.
TUTORIAL
Start cutting out the template pieces. Pin them to your fabric, draw around the pieces using a tailor chalk, then cut them out [wc_highlight color="red"](1)[/wc_highlight] .
Make sure you have the following pieces:
- two brown ears
- two yellow inner ears
- two yellow muzzles
- one black nose and mouth
COVER THE HAIRBAND
Cut out some brown felt strips and wrap them around the hairband, fastening them with some drops of hot glue [wc_highlight color="red"](2)[/wc_highlight] . Continue until wrapping the whole hairband [wc_highlight color="red"](3)[/wc_highlight] .
MAKE THE EARS
Sew the inner yellow ears on the brown ears, using the sewing machine and the brown thread [wc_highlight color="red"](4)[/wc_highlight] . Wrap the ears around the hairband, folding them in half and matching the ends. Sew them by hand on the base, near the hairband and all around near the edge, using the brown thread [wc_highlight color="red"](5)[/wc_highlight] .
MAKE THE FACE
Sew nose and mouth to the muzzle, using the black thread [wc_highlight color="red"](6)[/wc_highlight] . Match the two yellow pieces and sew them together along the edges using the sewing machine and the brown thread, leaving an opening. Fill the face with the stuffing [wc_highlight color="red"](7)[/wc_highlight] and sew the opening. Fasten the stick to the muzzle, using the hot glue [wc_highlight color="red"](8)[/wc_highlight] .
[/wc_tab]
[/wc_tabgroup]
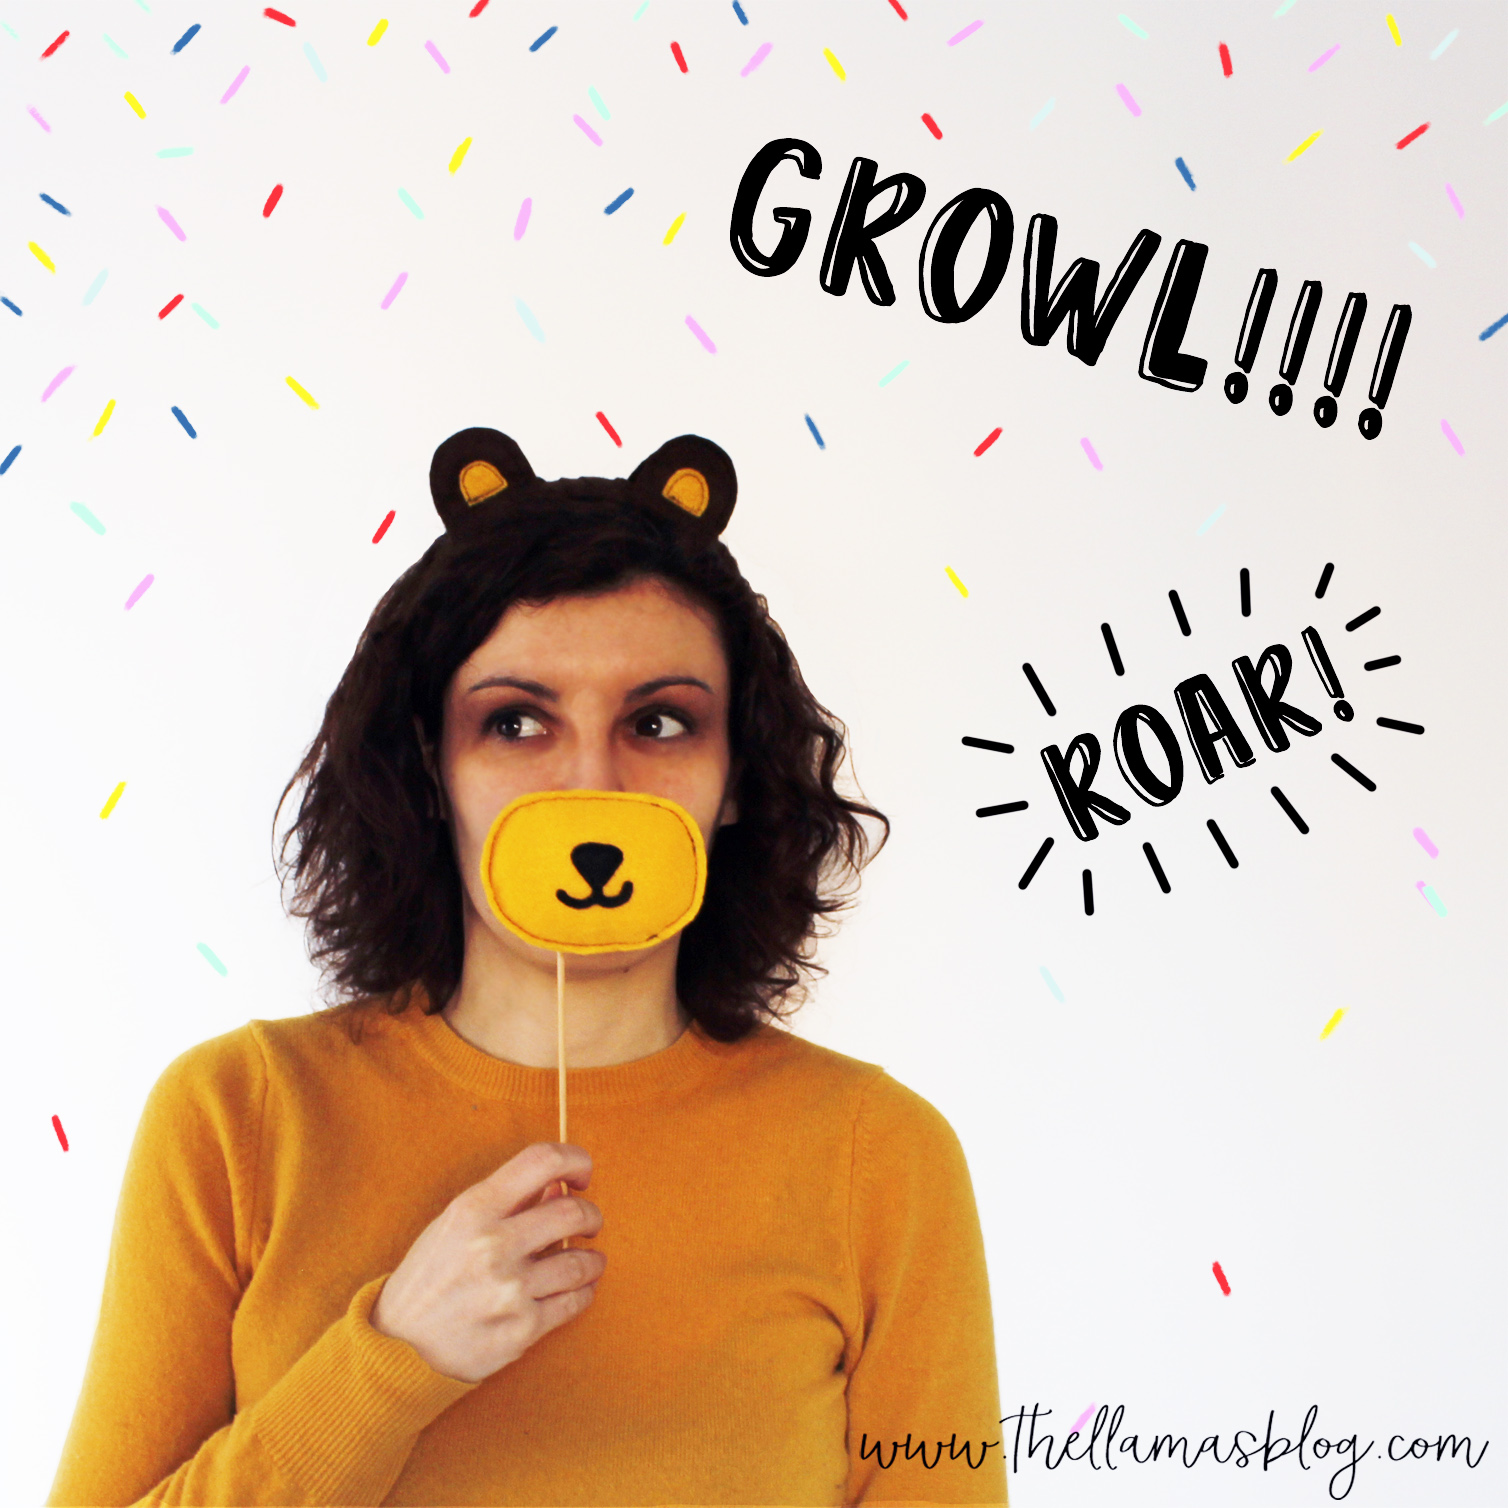
Not having any little models to photograph, we decided that Maria Elisa would sacrifice her dignity for the cause, losing what little credibility she had left XD Show us your costumes using the hashtag #makethingsnotdramas!
We don't have any baby model available to photograph, so we decided that Maria Elisa would have sacrificed her dignity for the cause, losing the minimum credibility she used to have in her life