DIY REMOVABLE COLLAR // SEWING TUTORIAL + DOWNLOAD

After a long time we are back on the blog with a nice sewing tutorial, that we are sure will be very useful to you! In our closet we all have that cute dress or sweater, maybe with a timeless line, but that is missing something. A nice round collar can be the solution! With this tutorial we will teach you how to make a detachable collar, in just a few steps. You will be able to give any dress or t-shirt in your wardrobe (with a round neck) a 60s touch! It's easier than it seems :)
After a long time we are back the blog with a nice sewing tutorial, which we are sure will be very useful! In the closet we all have that dress or that cute sweater, perhaps with a timeless line, but which is missing something. A nice round collar can be the solution! With this tutorial we teach you how to make a detachable collar, in a few moves. You will be able to give any dress or shirt in your wardrobe (with a round neckline) a 60s touch! It is easier than it seems :)
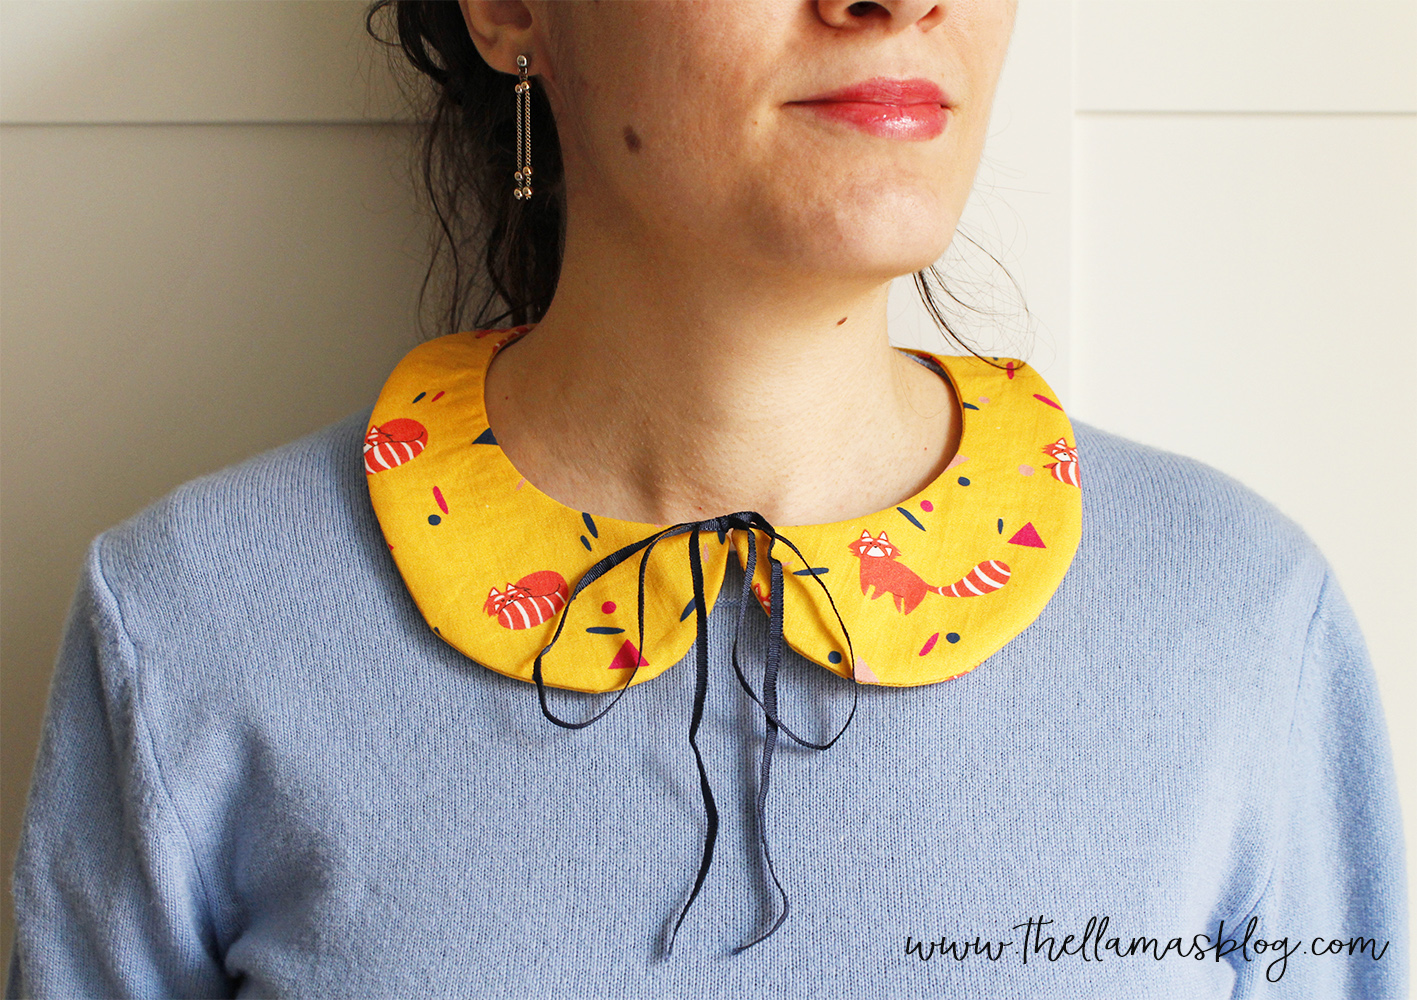
We used one of our colorful fabrics to add a bit of color to some monochrome sweaters, but the collar is also perfect in a neutral tone. This is the project you've been waiting for to use up the fat quarters of that beautiful fabric that you couldn't resist, but that were locked away in the drawer. And if you scale down the pattern measurements, it's also great for children.
We used one of our colorful fabrics to give some monochromatic sweaters some color, but the collar is also perfect in a neutral tone. It is the perfect project for the fat quarters of that beautiful fabric that you couldn't resist, but you don't know how to use. And if you scale the measurements of the pattern, it is fine for children too.
FOR THE TUTORIAL IN ENGLISH CLICK ON THE “ENGLISH” LABEL.
[wc_tabgroup class="" layout="box"]
[wc_tab title="ENGLISH"]
MATERIALS
- cotton fabric (the one with the red pandas can be found HERE)
- thermo-adhesive canvas
- pattern (see below)
- sewing machine
- colored sewing thread (matching or contrasting with the chosen fabric)
- satin ribbon (in the same color or contrasting with the chosen fabric)
- pins
- sewing needle
- fabric scissors
- pencil or tailor's chalk
DOWNLOAD PATTERN
- Download the collar pattern in PDF here.
HOW TO MAKE A DETACHABLE COLLAR
CUT OUT THE VARIOUS PIECES
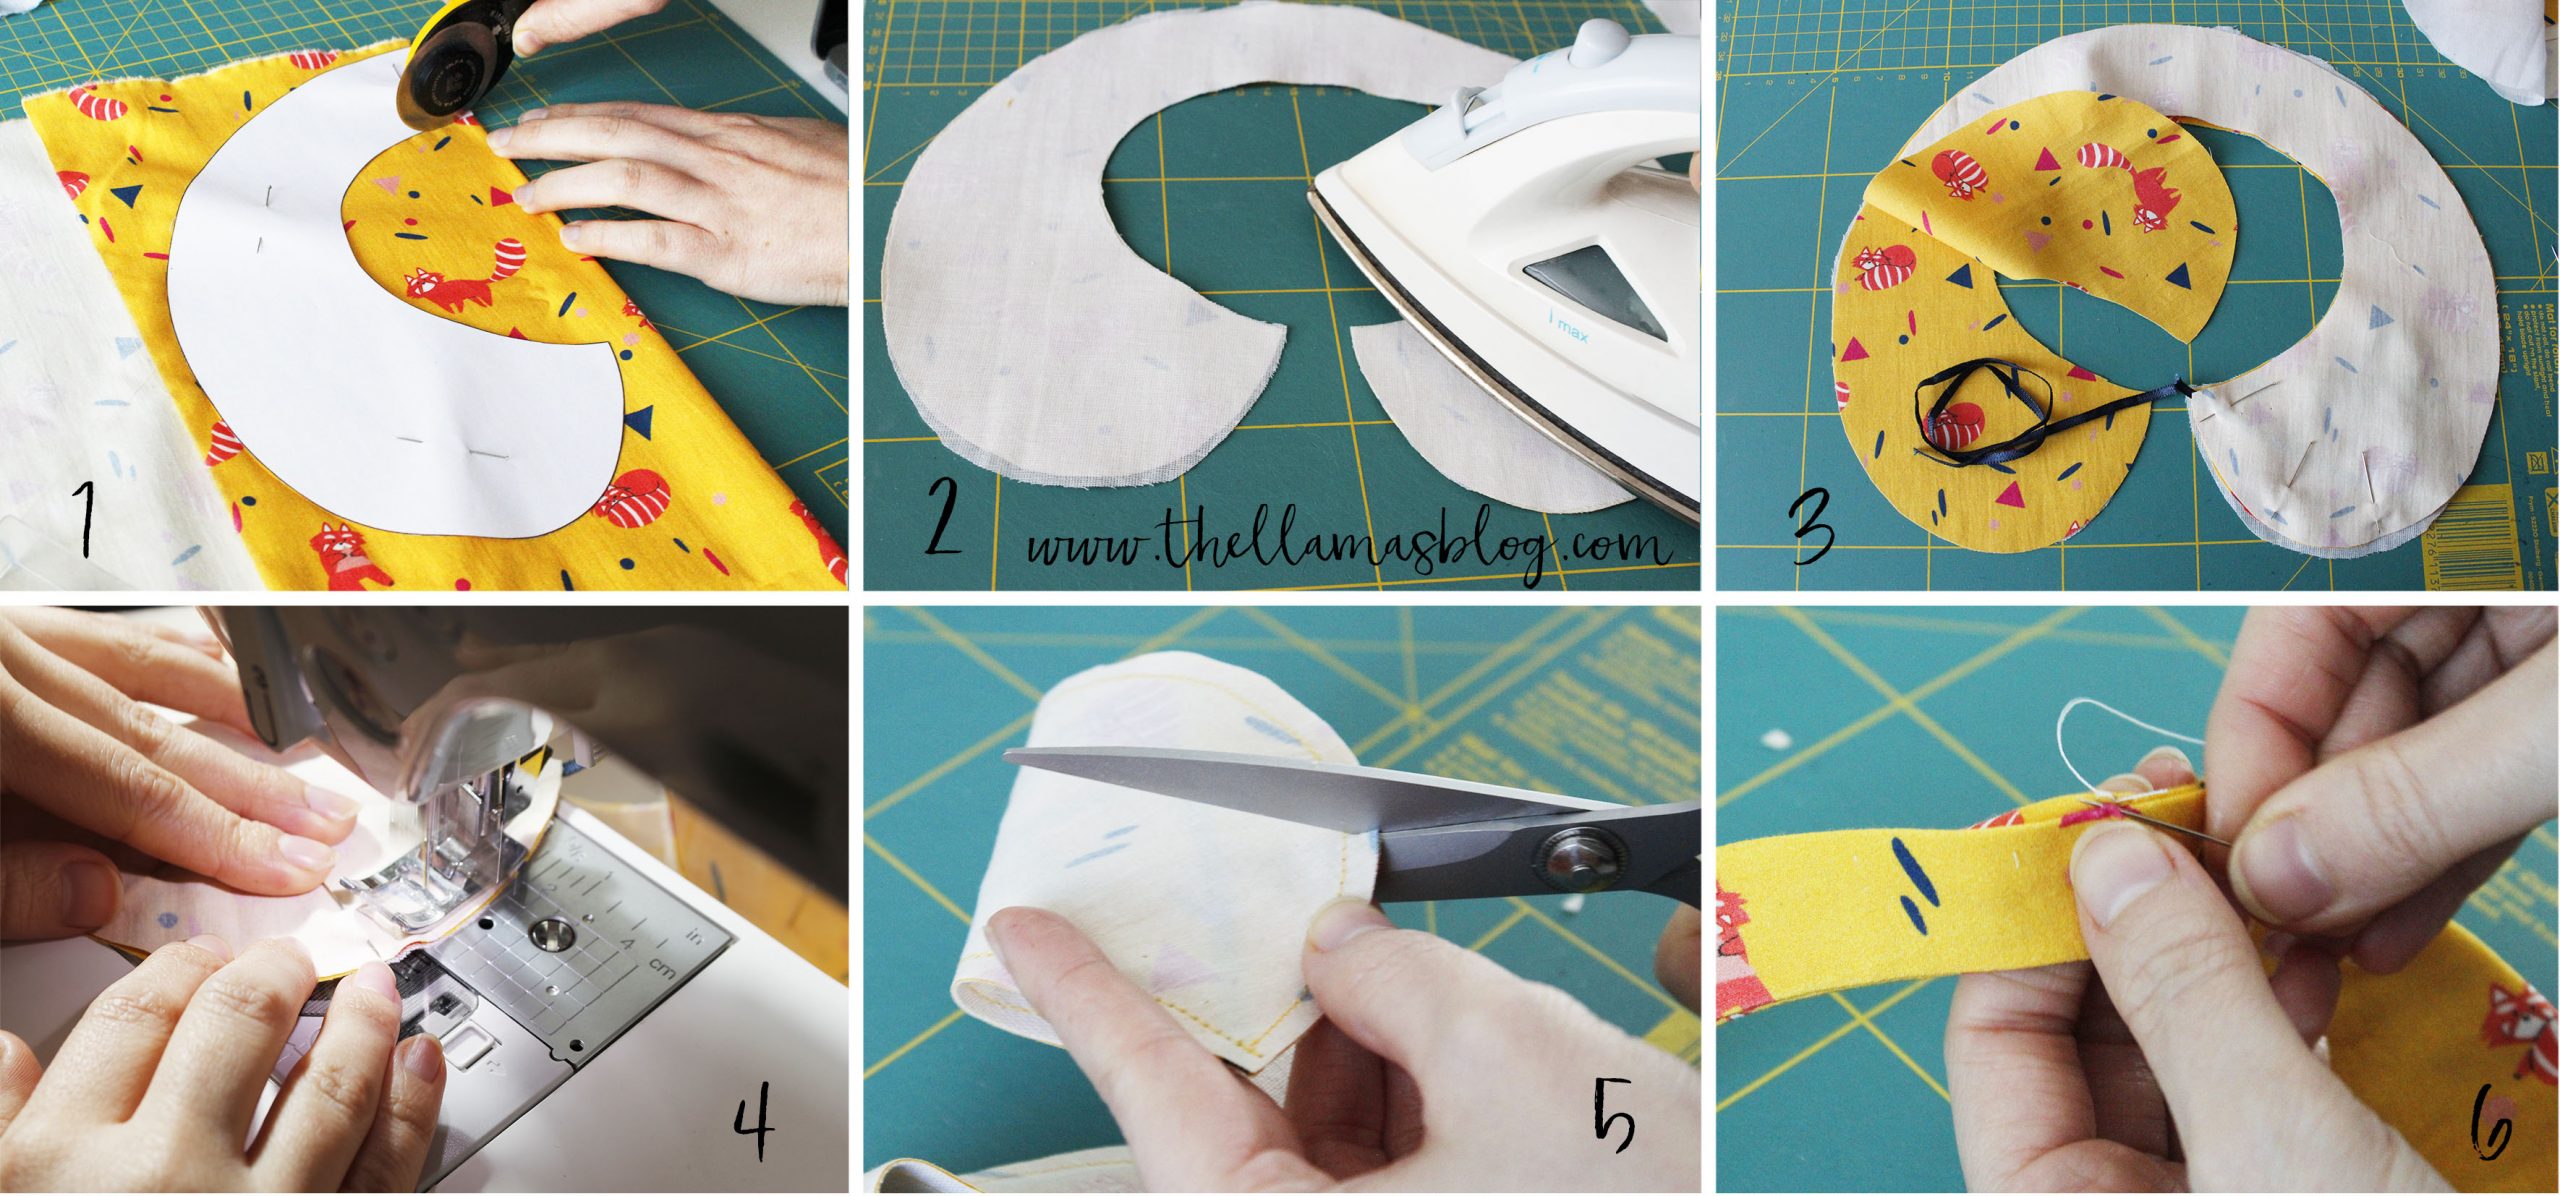
Fold the fabric in half and start cutting out the various parts of the pattern. Secure them to the fabric with pins and draw the outlines with the tailor's pencil, then cut it all out [wc_highlight color="red"](1)[/wc_highlight]. Follow the same procedure with the interfacing.
Make sure you have the following pieces:
- two pieces of fabric
- one of canvas
Cut two pieces of satin ribbon, approximately 13 inches (33 cm) each.
ATTACH THE CANVAS
Place the adhesive backing over the back of one of the collar pieces, and iron to adhere it to the fabric. The backing side should be on top when the collar is worn.
PUT THE PIECES TOGETHER
Overlap the two pieces of collar, matching the right sides inward. Inside the two fabrics, in the inner corners, insert the satin ribbons and secure them with a pin.
SEW THE COLLAR
Taking care not to sew the satin ribbons, sew around the collar with a 0.5 cm margin. Only the ends of the ribbons (those attached to the two corners of the collar) should be sewn. Leave an opening at the top, so that you can later turn the fabric inside out.
Make small cuts around the curves, avoiding cutting into the seam. Do not cut near the opening at the top.
TURN THE FABRIC OVER AND FINISH
Patiently turn the fabric inside out by passing it through the opening at the top. Lightly iron the collar, protecting it with a cloth, then close the opening at the top, securing it with pins.
[/wc_tab]
[wc_tab title=" ENGLISH "]
MATERIALS
- cotton fabric (you can find this one with the red panda pattern HERE)
- light/medium fuse interfacing (optional)
- sewing template (see below)
- sewing machine
- colored sewing thread (matching or in contrast with the chosen fabric)
- satin ribbon (matching or in contrast with the chosen fabric)
- pins
- sewing needle
- fabric scissors
- taylor chalk
DOWNLOAD TEMPLATE
- Download the collar pdf template here.
HOW TO MAKE THE DETACHABLE COLLAR
CUT THE FABRIC PIECES
Fold the fabric in half and start cutting out the various parts of the template. Secure it on the fabric with pins and draw the outlines with a tailor's chalk, then cut it out. Follow the same procedure with the interfacing.
Make sure you have the following pieces:
- two pieces of fabric
- one of interfacing
Cut two pieces of satin ribbon of about 33 cm each.
ATTACH THE INTERFACE
Overlap the piece of adhesive cloth on the back of one of the two pieces of collar, and iron to make it stick to the fabric. The side with the canvas must be at the top when the collar is worn.
PUT THE PIECES TOGETHER
Overlap the two pieces of collar by matching the right sides inwards. Inside the two fabrics, in the internal corners, insert the satin ribbons and secure them with a pin.
SEW THE COLLAR
Taking care not to sew the satin ribbons, sew the collar outline with a margin of 0.5 cm. Only the ends of the ribbons (those attached to the two corners of the collar) should be sewn. Leave an opening at the top, so you can then turn the fabric upside down.
Make small cuts around the curves, avoiding cutting the seam. Do not cut near the opening at the top.
TURN THE FABRIC UPSIDE DOWN AND FINISH
Patiently turn the fabric upside down by passing it through the opening at the top. Slightly iron the collar, protecting it with a cloth, then close the opening at the top, fixing it with pins.