DIY MARDI GRAS BEAR COSTUME
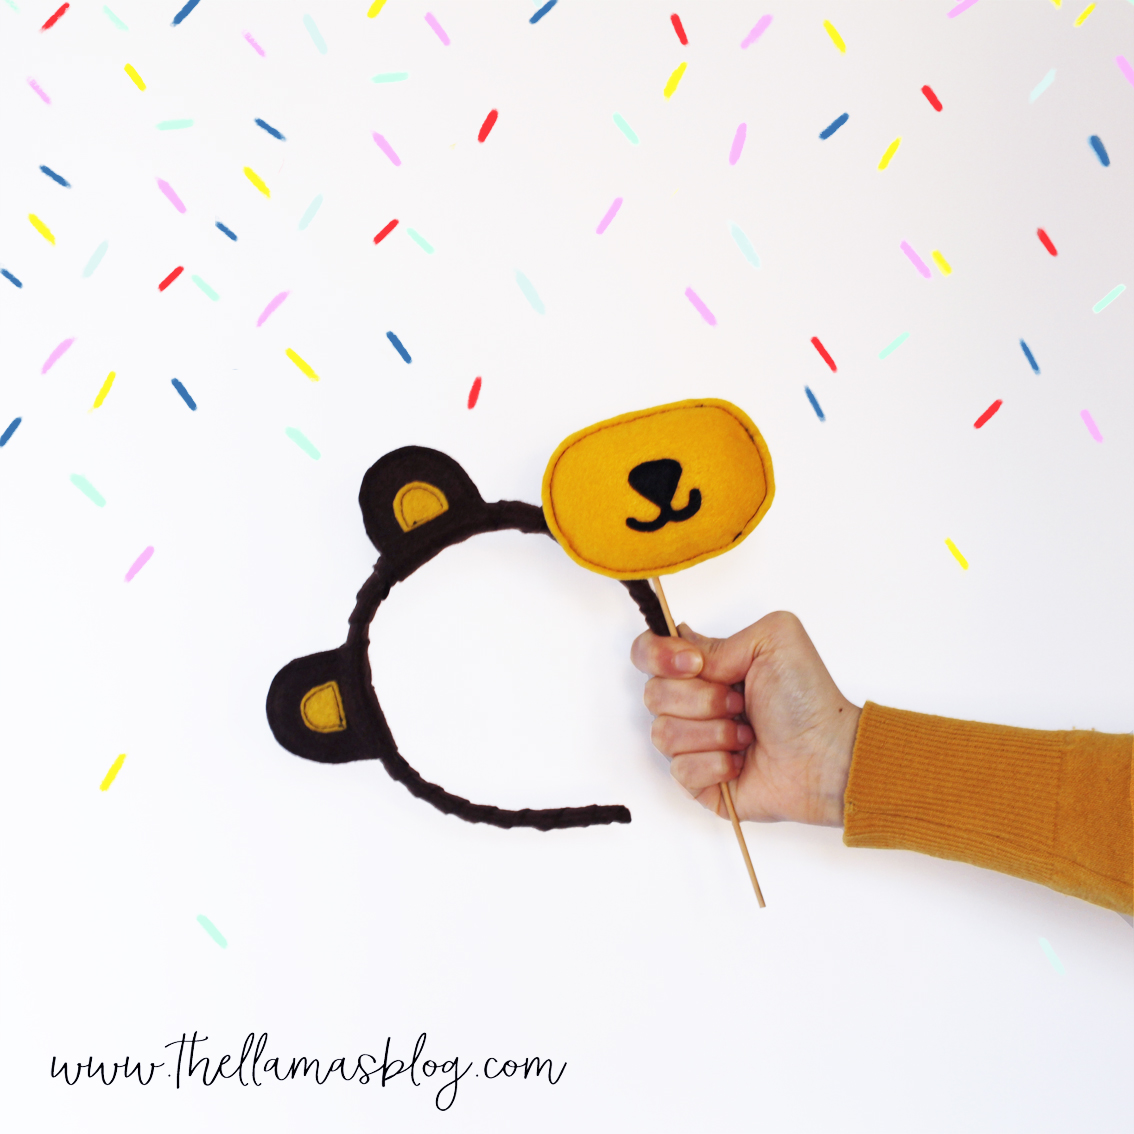
Bentornati! Ebbene si, siamo sopravvissute alla frenesia del Natale e siamo tornate con un nuovo diy. Ci siamo rese conto che in questi anni di attività del blog non abbiamo mai pubblicato alcun tutorial o freebie per carnevale. E' una festività che permette di dare libero sfogo alla fantasia, ma chissà come mai viene spesso trascurata. Quindi abbiamo deciso di rimediare! Abbiamo preparato un costume da orsetto davvero facilissimo da realizzare, composto da orecchie e musetto...per completarlo bastano un maglione marrone o giallo, un po' di trucco e il gioco è fatto! Ora passiamo al tutorial!
Welcome back! Yes, we survived to Christmas and we're back with a new diy. We realized that in these years of blog activity we never published any tutorials or freebie for Carnival. It's a very colorful and creative occasion, but (who knows why!) it's often overlooked. So we decided to put it right! We have prepared a Bear Costume that is very easy to make, composed of ears and nose...to complete it you just need a brown or yellow sweater, a little 'make-up and you're done! Let's move to the pattern!
FOR THE TUTORIAL IN ENGLISH CLICK ON THE “ENGLISH” LABEL UNDER THE PHOTO.
[wc_tabgroup layout="box"]
[wc_tab title="ITALIANO"]
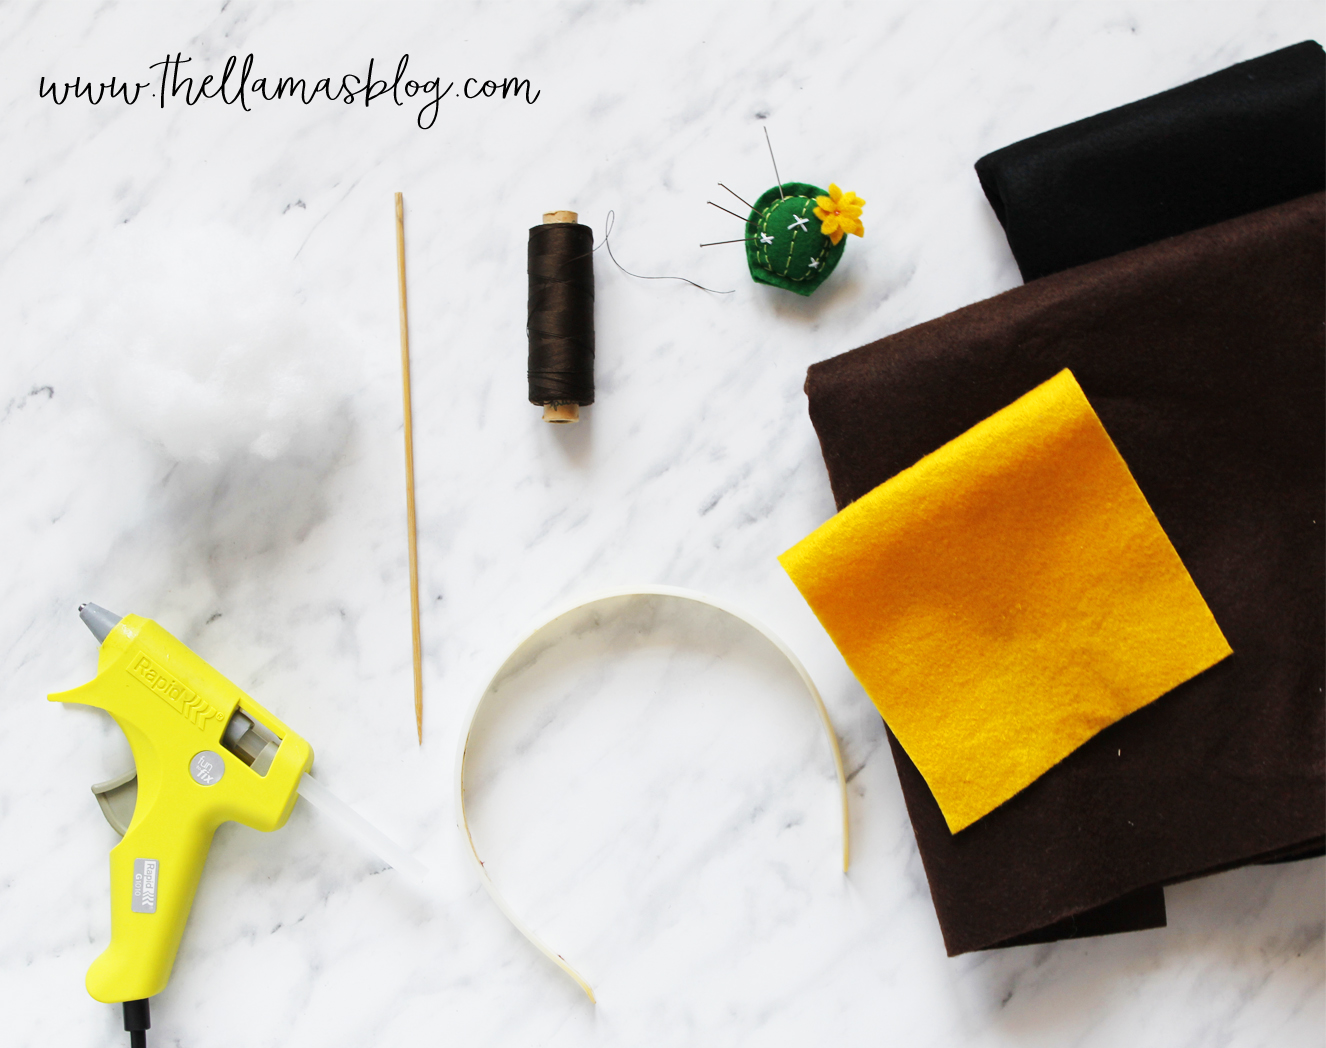
MATERIALI
- feltro marrone, giallo e nero
- cartamodello (vedere qui in basso)
- cerchietto
- imbottitura
- uno stecchino di legno o in plastica
- colla (preferibilmente colla a caldo)
- macchina da cucire
- filo nero o marrone da cucito
- spilli
- ago da cucito
- forbici per tessuto
- matita o gessetto da sarto
DOWNLOAD CARTAMODELLO
- Scaricate qui il cartamodello in pdf.
PROCEDIMENTO
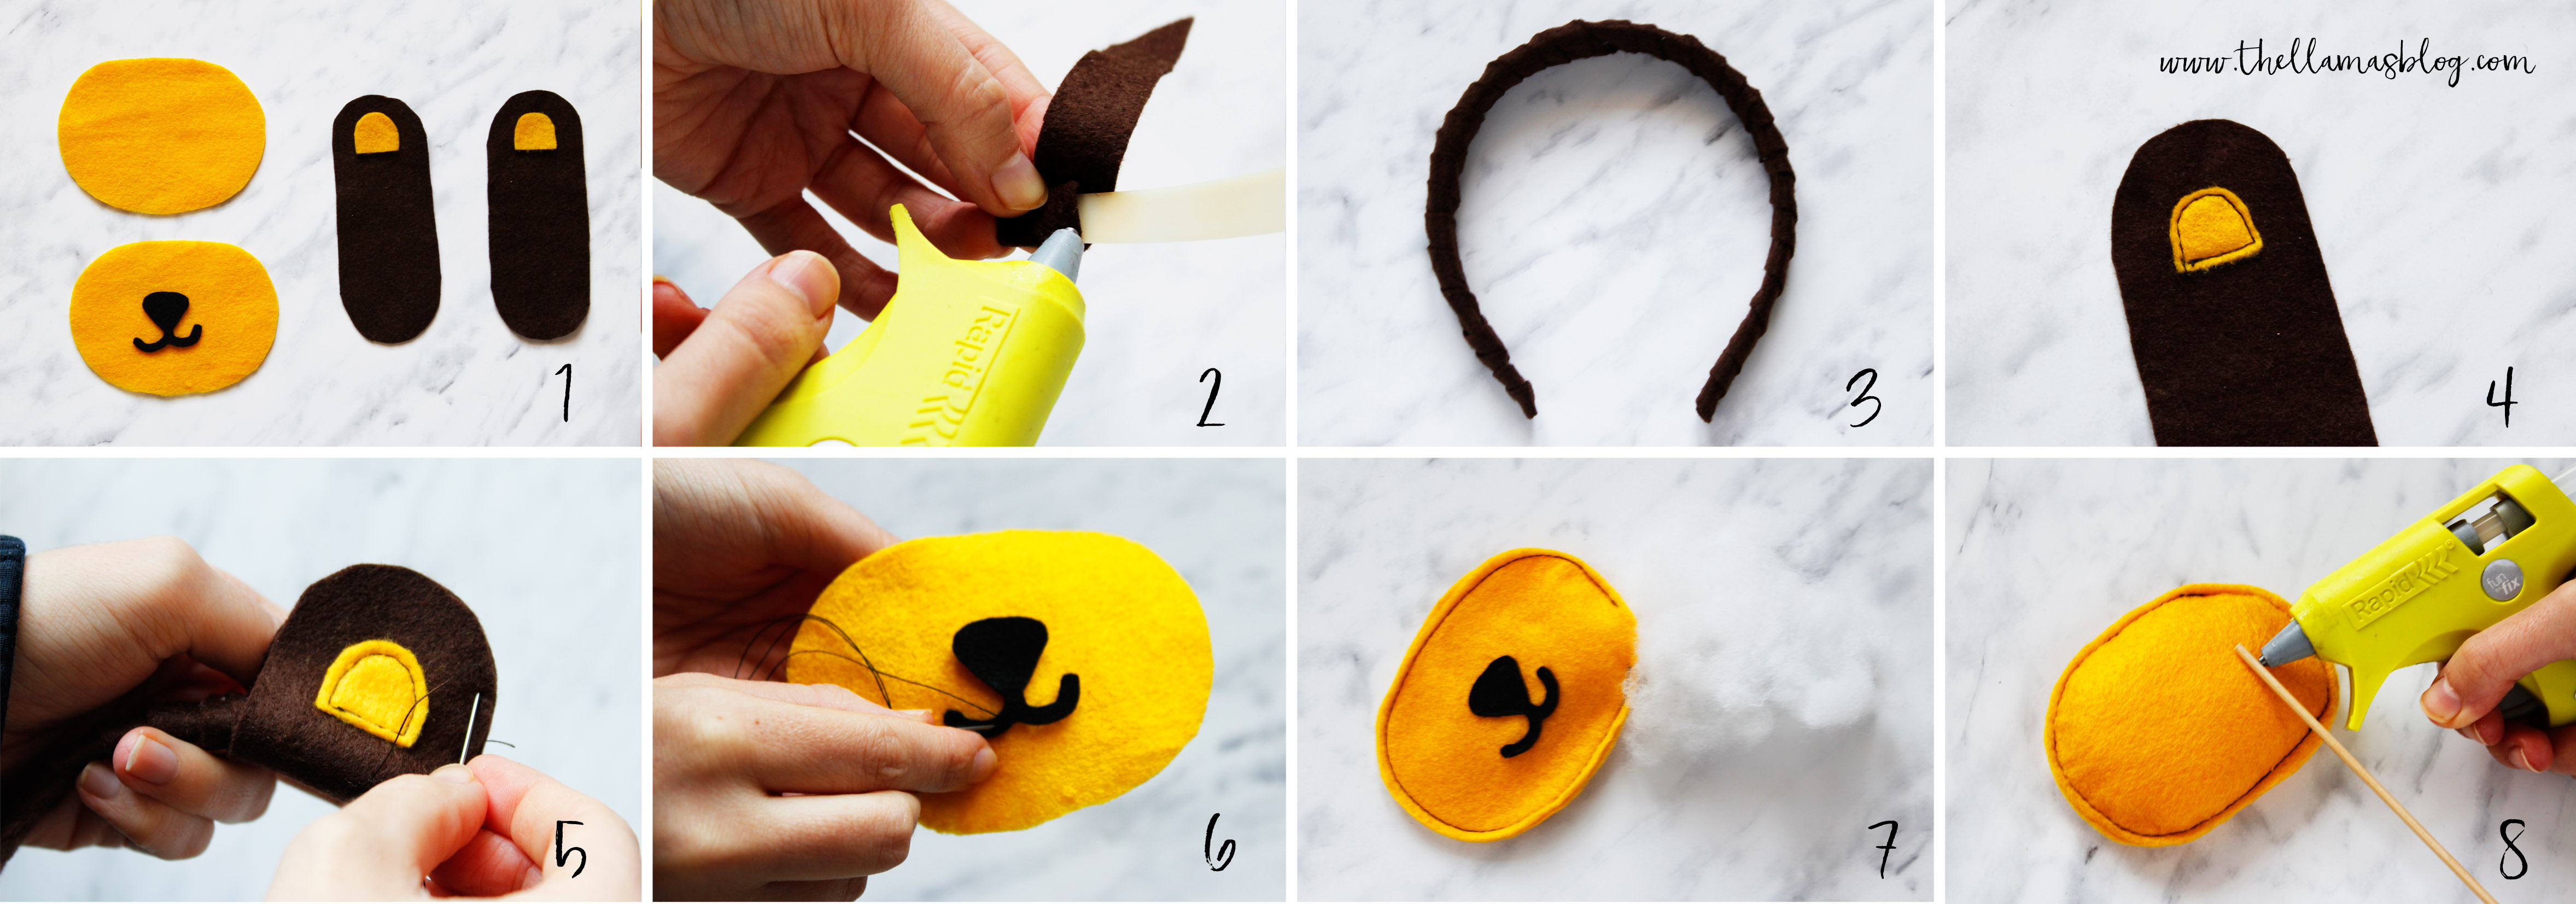
RITAGLIA I VARI PEZZI
Comincia a ritagliare le varie parti del cartamodello. Assicurale sulla stoffa con degli spilli e disegna i contorni con la matita da sarto, poi ritaglia il tutto [wc_highlight color="red"](1)[/wc_highlight].
Assicurati di avere i seguenti pezzi:
- due orecchie marroni
- due interno orecchie gialli
- due musetti gialli
- un naso e bocca nero
RICOPRI IL CERCHIETTO
Ritaglia delle strisce di feltro e arrotolale intorno al cerchietto, fermandole in alcuni punti con la colla a caldo [wc_highlight color="red"](2)[/wc_highlight]. Continua fino a ricoprire l’intero cerchietto [wc_highlight color="red"](3)[/wc_highlight].
CREA LE ORECCHIE
Cuci l’interno delle orecchie giallo sulle orecchie marroni, usando la macchina da cucire e il filo marrone [wc_highlight color="red"](4)[/wc_highlight]. Avvolgi le orecchie intorno al cerchietto, piegandole a metà e facendo combaciare le estremità. Fissale cucendole a mano alla base, vicino al cerchietto, e tutto intorno vicino al bordo, usando il filo marrone [wc_highlight color="red"](5)[/wc_highlight].
CREA IL MUSETTO
Cuci naso e bocca sul muso, con ago e filo nero [wc_highlight color="red"](6)[/wc_highlight]. Fai combaciare i due pezzi gialli e cucili insieme lungo i bordi usando la macchina e il filo marrone e lasciando un’apertura. Riempi il musetto con l’imbottitura [wc_highlight color="red"](7)[/wc_highlight] e cuci l'apertura. Attacca lo stecchino al muso, usando la colla [wc_highlight color="red"](8)[/wc_highlight].
[/wc_tab]
[wc_tab title="ENGLISH"]
MATERIALS
- brown, yellow and black felt
- sewing template (see below)
- hairband
- stuffing
- a wooden or plastic stick
- glue (preferably hot glue)
- sewing machine
- black or brown sewing thread
- pins
- sewing needle
- scissors
- taylor chalk
DOWNLOAD TEMPLATE
- Download here the pdf template.
TUTORIAL
CUTTING OUT
Start cutting out the template pieces. Pin them to your fabric, draw around the pieces using a tailor chalk, then cut them out [wc_highlight color="red"](1)[/wc_highlight].
Make sure you have the following pieces:
- two brown ears
- two yellow inner ears
- two yellow muzzles
- one black nose and mouth
COVER THE HAIRBAND
Cut out some brown felt strips and wrap them around the hairband, fastening them with some drops of hot glue [wc_highlight color="red"](2)[/wc_highlight]. Continue until wrapping the whole hairband [wc_highlight color="red"](3)[/wc_highlight].
MAKE THE EARS
Sew the inner yellow ears on the brown ears, using the sewing machine and the brown thread [wc_highlight color="red"](4)[/wc_highlight]. Wrap the ears around the hairband, folding them in half and matching the ends. Sew them by hand on the base, near the hairband and all around near the edge, using the brown thread [wc_highlight color="red"](5)[/wc_highlight].
MAKE THE FACE
Sew nose and mouth to the muzzle, using the black thread [wc_highlight color="red"](6)[/wc_highlight]. Match the two yellow pieces and sew them together along the edges using the sewing machine and the brown thread, leaving an opening. Fill the face with the stuffing [wc_highlight color="red"](7)[/wc_highlight] and sew the opening. Fasten the stick to the muzzle, using the hot glue [wc_highlight color="red"](8)[/wc_highlight].
[/wc_tab]
[/wc_tabgroup]
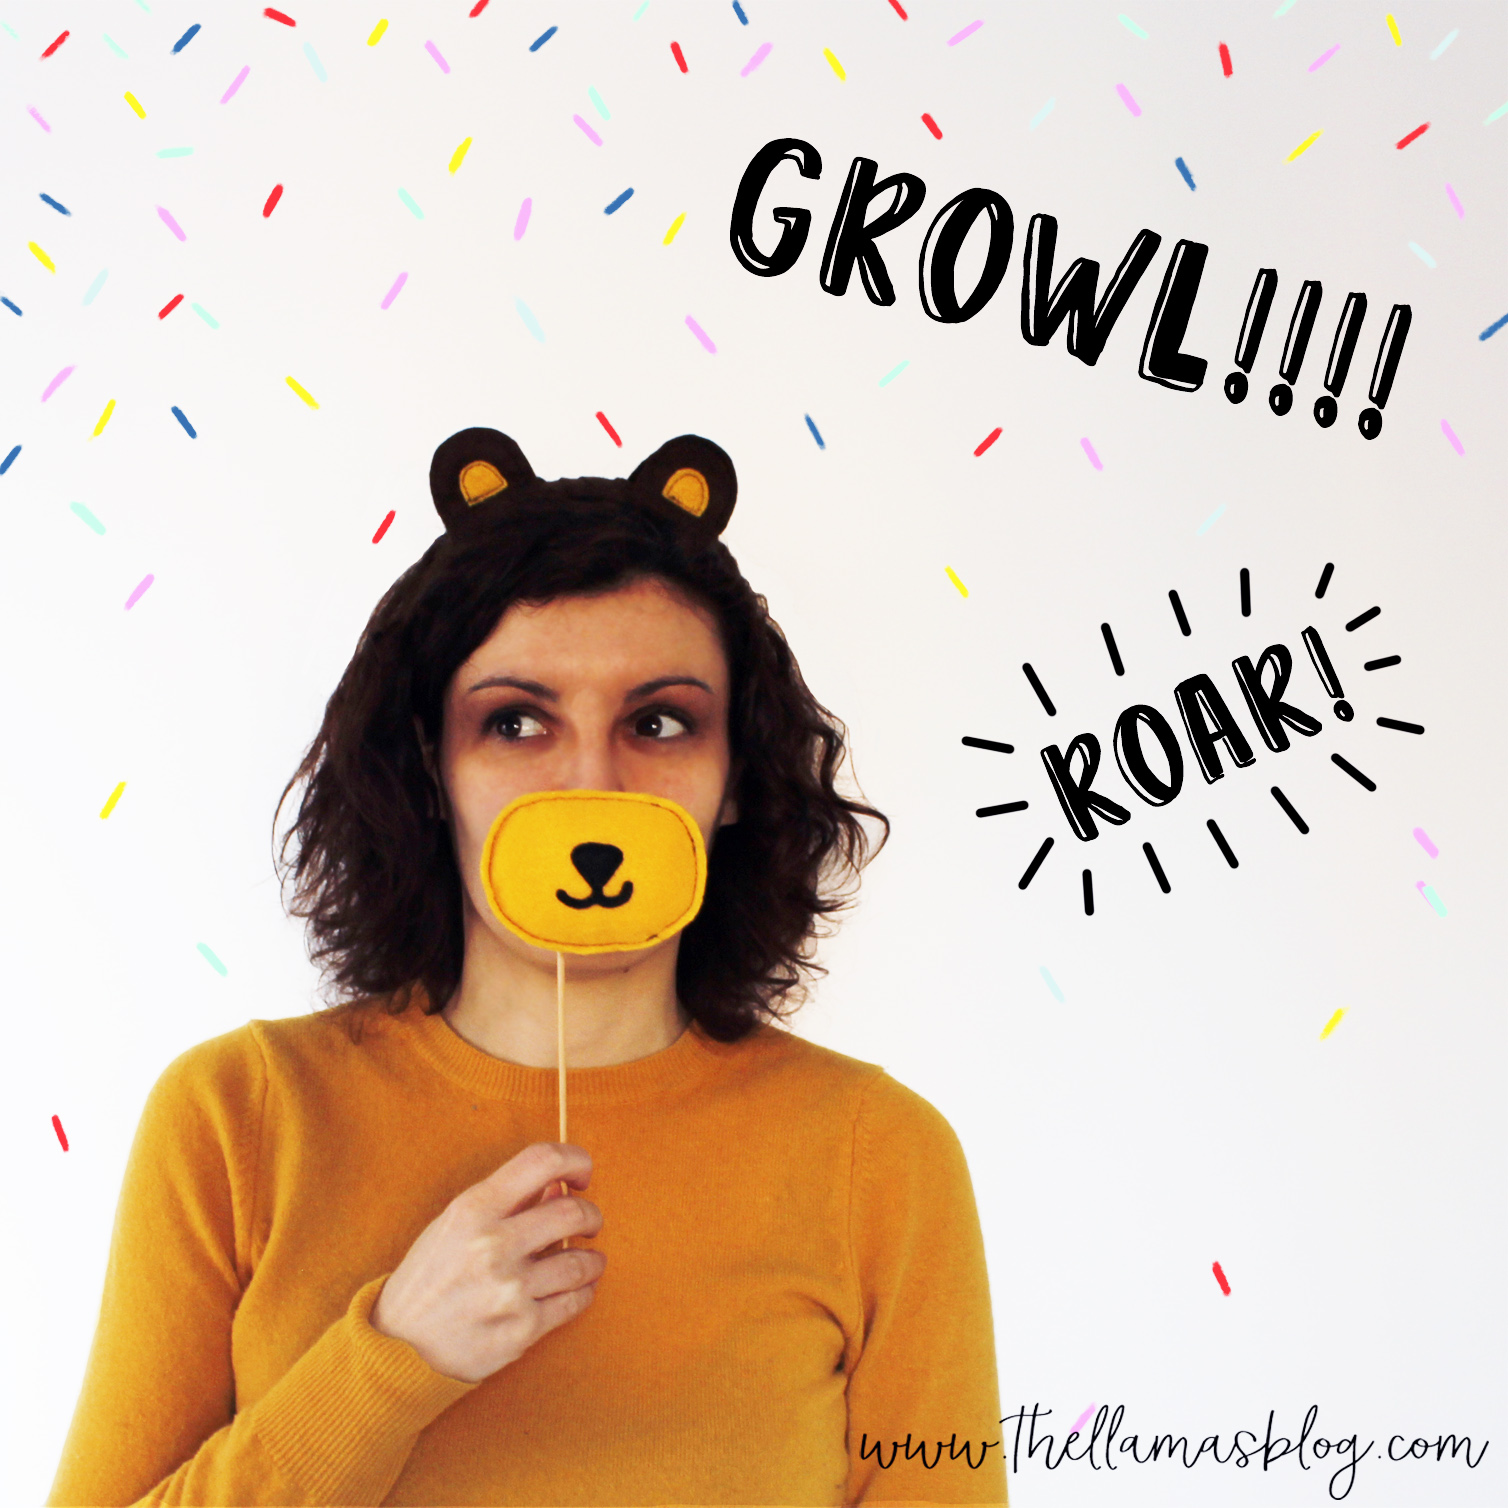
Non avendo a disposizione alcun piccolo modello da fotografare abbiamo deciso che Maria Elisa avrebbe sacrificato la propria dignità per la causa, perdendo quel minimo di credibilità che le era rimasta XD Mostrateci i vostri costumi usando l'hashtag #makethingsnotdramas!
We don't have any baby model available to photograph, so we decided that Maria Elisa would have sacrificed her dignity for the cause, losing the minimum credibility she used to have in her life XD Show us your costume with the hashtag #makethingsnotdramas!